Homemade Strawberry Jam

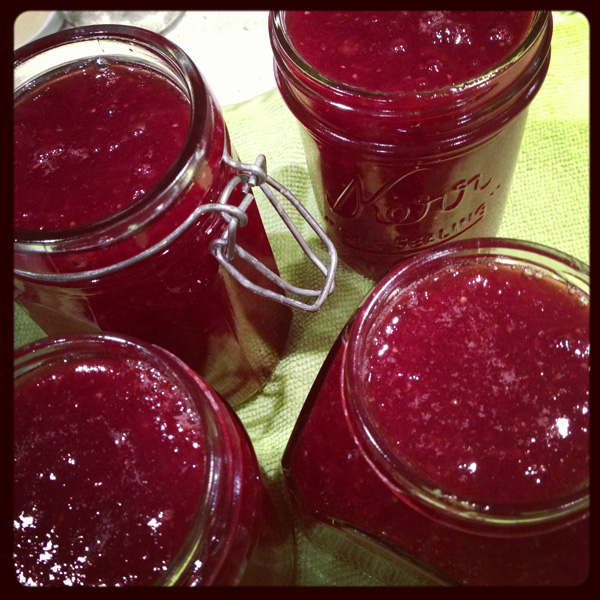
Only I would have the great idea of making strawberry jam on a day where the temperature was in the mid 30’s (celsius).  A friend and I had the idea to go berry picking, only to arrive at one (of many) berry farms to find we had to pay over $12 for adults and over $6 for children, just for the privilege of picking berries.  The guy kindly pointed out that, that price entitled you to the first 1.5kg berries!  Um, I don’t think so.  So we promptly hopped back in the car and headed up the road to another farm.  I’m happy to say the next farm was much more friendly price-wise, with the purchase of a huge box of strawberries for $15, probably about 7-8kg.  They were so sweet and juicy.  Some of them where monsters in size.  I knew I would have to cook the strawberries up the same night or they would spoil.  Needless to say, I was up till late making multiple batches of jam, but I’m happy to say that our pantry is now looking well stocked of jam.  I think I will be back there next week to purchase more berries to make another batch to see us through till next berry season.

Just out of interest, I used both my Thermomix and the stovetop to cook the jam.  The Thermomix made a more smooth, but runnier jam, but with the benefit of not having to stir it.  The Thermomix jug rinsed out easily with no scrubbing.  Cooking the jam on the stovetop produced a thicker more chunky jam, but I had to continuously stir it to prevent it sticking on the bottom.  I had to soak the pot afterwards.  There was no difference in the taste.

As for sterilising jars, I prefer to boil my jars and lids.

Strawberry Jam
 
Author:
Recipe type: Jam, Preserves
 
Thermomix method. 750gm of strawberries is about the maximum you can make in the Thermomix without it bubbling out over the top.
Ingredients
  • 750gm strawberries, washed and hulled
  • 1 lemon, zest and juice
  • 350gm sugar
Instructions
  1. Place all ingredients in Thermomix and set temperature to 100 degrees celsius. Put timer on for at least 40 minutes to 1 hour on speed 1½ to 2. Be mindful that the jam may bubble out of the hole in the lid while cooking. I placed a sieve over the opening to prevent too much bubbling over.
  2. Once cooked and while jam is still hot, place in sterilised jars and seal immediately. Store in a cool place, out of direct sunlight for up to 6 months.
  3. Makes approximately 3½ cups.

 
Strawberry Jam
 
Author:
Recipe type: Jam Preserves
 
This is the stovetop version. I don't like to cook more than 1kg of fruit at a time on the stovetop, as the more fruit you add, the longer the cooking time. I prefer to use a heavy based cast iron pan.
Ingredients
  • 1kg strawberries, washed and hulled
  • 500gm sugar
  • 1 lemon, zest and juice
Instructions
  1. Place all ingredients in a heavy based pot over a medium to low heat. Stir regularly to prevent the jam sticking on the bottom.
  2. Simmer gently for approximately 1 hour or until jam thickens.
  3. While still hot, pour jam into sterilised jars.
  4. Seal immediately.
  5. Store in a cool place out of direct sunlight for up to 6 months.
  6. Makes approximately 4 cups.


Posted in Gastronomic Explosions - aka Yummy Food/Recipes | Tagged , , , | 2 Comments

This Moment

From Soulemama {this moment} – A Friday ritual. A single photo – no words – capturing a moment from the week. A simple, special, extraordinary moment.  A moment I want to pause, savour and remember.

Daylight savings is making it nearly impossible for me to join in on a Friday at the moment.  I’ll be along to check out your gorgeous moments over the weekend.

I love your moments too.  So feel free to leave a link in the comment section for us all to see.  Have a beautiful weekend.  Jacinta x

Posted in This Moment | Tagged , | 4 Comments

Last Minute Sewing – Birthday Skirt

Tenneille had a birthday to go to recently and of course, in my usual fashion, had avoided the shops all week.  I thought I had found time to make the top from a version of this dress pattern I had used for Tenneille’s birthday dress earlier in the year, but of course mothering duties called and it got to an hour before the party before I could get near my sewing machine.  This called for some quick thinking and I decided I could put a skirt together, without a pattern as such, in an hour, ahem!  Ok, so it took me an hour and a half.  Thankfully Greg took Tenneille to the party and I picked her up and delivered the present, talk about cutting it fine!

Do you craft by the seat of your pants too?  Jacinta x


Posted in Craft | Tagged , , | 4 Comments

This Moment

From Soulemama {this moment} – A Friday ritual. A single photo – no words – capturing a moment from the week. A simple, special, extraordinary moment.  A moment I want to pause, savour and remember.

I love your moments too.  So feel free to leave a link in the comment section for us all to see.  Have a beautiful weekend.  Jacinta x

Posted in Knitting, This Moment | Tagged , , | 4 Comments

Herbed Chicken and Tofu Bites

Herbed Chicken and Tofu Bites
 
Author:
Recipe type: Finger food, Main
 
These chicken bites are so tasty. Make as party finger food or have as part of a main meal. I make half the batch without sesame seeds and the other half with. My children love them. I make them in my thermomix, but a food processor will work well too.
Ingredients
  • 2 chicken fillets, skin removed and diced
  • 200gm firm tofu, cubed, I use a satay flavoured one, but plain tofu works well too
  • 1 onion, cut into 4
  • 1 egg
  • 1 clove garlic
  • 1 slice bread
  • 1 tsp dried rosemary or small sprig if fresh
  • 2 springs fresh coriander
  • 1 spring onion, roughly chopped
  • ¼ tsp salt or seasoning of choice
  • oil for cooking
  • ⅓ - ⅔ cup sesame seeds, optional
Instructions
  1. Thermomix Method
  2. Break up slice of bread into large chunks and place in Thermomix. Mix on sp 7 for 5 seconds, until fine crumbs form. Pour into bowl and put aside.
  3. Place onion, garlic, rosemary, coriander and spring onion. Blend on sp 5 for approximately 5 seconds.
  4. Place chicken and tofu in Thermomix and blend on sp7 for 5 seconds. Add egg, salt and bread crumbs into Thermomix. Blend on sp 6 for 5 seconds or until evenly mixed.
  5. Form mixture into small bite-size balls and place in a frypan over a medium heat, with a small amount of oil. If using sesame seeds, coat the chicken balls evenly before adding to the pan. Brown on all sides.
  6. Cook in batches. Keep chicken bites warm in oven @160℃ and to ensure they are cooked through. Makes approximately 40. Serve with your favourite dipping sauce or as a main meal with rice and steamed vegetables.
  7. Conventional Method
  8. Follow Thermomix method, only determine each mixing time to suit your food processor.
  9. Cook as per above instructions.


Posted in Gastronomic Explosions - aka Yummy Food/Recipes | Tagged , , , , | 1 Comment

Pan Seared Salmon with Honey and Chilli

Pan Seared Salmon with Honey and Chilli
 
Author:
Recipe type: Main
Cuisine: Asian Influence
Serves: 2-4
 
This is a tasty salmon dish filled with lots of Asian flavours. The salmon remains lovely and moist as you finish off the cooking in the oven. You can alter the heat of the dish by adding more chilli or if you prefer, you can omit the chilli altogether if you are not a fan.
Ingredients
  • 800gm salmon, evenly sliced into fillets (approx. 4-5 pieces)
  • 2 tbsp soy sauce
  • 1½ tbsp honey
  • 1 fresh chilli, finely chopped
  • 1 tbsp vinegar
  • 1 clove garlic, finely chopped
  • 1 cm knob ginger, finely grated
  • ½ tsp fish sauce
  • 1tsp sesame seeds
  • ¼ tsp sesame oil
  • 2 tbsp oil for cooking
Instructions
  1. Mix all ingredients except salmon, sesame seeds and cooking oil, in a jug and let stand. If possible make ahead of time, as this will allow the flavours to better infuse.
  2. Meanwhile, heat heavy based oven proof pan over medium-high heat. Pour in oil and coat the base of the pan evenly. Add in salmon and sear for 1 minute each side. Pour over sauce and sprinkle the salmon fillets with sesame seeds.
  3. Place pan in pre-heated oven @ 200℃ for 7 minutes. If you prefer your salmon pink in the middle cook for approximate 4-5 minutes.
  4. Once cooked, serve over steamed rice or steamed vegetables. Spoon over some of the sauce from the pan.


Posted in Gastronomic Explosions - aka Yummy Food/Recipes | Tagged , , | 2 Comments

This Moment

From Soulemama {this moment} – A Friday ritual. A single photo – no words – capturing a moment from the week. A simple, special, extraordinary moment.  A moment I want to pause, savour and remember.

I love your moments too.  So feel free to leave a link in the comment section for us all to see.  Have a beautiful weekend.  Jacinta x

Posted in The Garden | Tagged , | 8 Comments

Puffing Billy

As a belated birthday present for Jairah, our train obsessed boy, we took a ride on Puffing Billy.  For those of you who are not familiar, Puffing Billy (well actually I think there are at least 3 different Puffing Billy engines) is a steam train that runs between Belgrave and Gembrook in Victoria’s Dandenong Ranges.  Sunday was a most glorious day weather wise, perfect for enjoying a train ride, which meant every other person had the same idea, as we ended up waiting an hour and a half to buy tickets!  Thankfully the kids handled it well and were still excited by the time we got on the train.  I love the fact that you can still sit on the edge of the train carriages and dangle your legs over the side while the train is moving.  The girls happily hung out the side of the train all the way to Emerald.  We hopped off at Emerald and headed off for ice cream and a play in the park.  Our return trip to Belgrave was just as fun and the kids had the best time.

Waiting for the train to arrive.

If you look through the middle of the window you can just see the engine in the distance. There were 13 carriages!

Us big people had fun too!

While waiting at the Menzie’s Creek station, another train was heading in the other direction.

I can highly recommend going on the train, although if you are catching the train from Belgrave on the weekend in the warmer months, be prepared to wait.  Otherwise consider catching it from Gembrook, Emerald or Lakeside Emerald, as the wait is generally not as long there.  It is suitable for all ages and you will be assured of having fun and the scenery is just gorgeous.  It is volunteer run and they are all so enthusiastic about their roles which I think adds a little magic to the whole experience.

Just enjoying the ride!

Jacinta x

Posted in Family Life, Recommendations | Tagged , , , | 2 Comments

This Moment

From Soulemama {this moment} – A Friday ritual. A single photo – no words – capturing a moment from the week. A simple, special, extraordinary moment.  A moment I want to pause, savour and remember.

I love your moments too.  So feel free to leave a link in the comment section for us all to see.  Have a beautiful weekend.  We are now in daylight savings, which makes it hard for me to stay up late to join in the fun.  I’ll catch you tomorrow my dear commenters!  Jacinta x

Posted in The Garden, This Moment | Tagged , | 6 Comments

Vegan Banana & Date Biscuits

This is such a yummy and quick recipe.  It’s about as healthy as biscuits get and made in the Thermomix, it is a breeze.  As well as being vegan, they are gluten free. They taste to me of sticky date pudding.  The biscuits are lovely and moist and I find it hard to stop at just one!  I am tempted to try and bake it in a pudding dish and see if I can make a pudding of sorts.  If I try it, I’ll be sure to post about it.

Ingredients:

3 bananas
1 cup dates
1/3 cup coconut oil, NB if coconut oil is really firm, soften slightly
1 tsp vanilla essence or 1/3 vanilla bean pod

Method for Thermomix:

place 1/3 vanilla pod in Thermomix and blend on speed 8 for 10 seconds.  Scrape down sides (if using vanilla essence, add it with the dates and coconut oil).  Add dates and coconut oil, blend on speed 5 for 5 seconds.  Add bananas and blend on speed 5 for 5 seconds.  Set aside for 15 minutes.  Place spoonfuls of mixture on a baking tray lined with baking paper and bake in oven @180 degrees celsius (375F) for 20 minutes or until golden brown.  Lovely served while still warm or let cool to room temperature.

Conventional method:

Chop dates finely, place in a bowl.  Mash bananas and add to the dates.  If using vanilla pod, chop finely and add the the other ingredients otherwise pour in vanilla essence.  Add coconut oil the rest of the mixture and stir well to combine.  Place spoonfuls of mixture on an oven tray lined with baking paper and bake @180 degrees celsius for 20 minutes or until golden brown.  Lovely served while still warm or cool to room temperature.

Enjoy!  Jacinta x

Posted in Gastronomic Explosions - aka Yummy Food/Recipes | Tagged , , , , , , | 2 Comments